As the Wright brothers progressed in their flying experiments, the sophistication of the selection and preparation of the fabric improved as well. Their first machines were covered with French sateen. Wilbur sewed the fabric for the 1900 glider on the front porch of the Tate family home, whom he boarded with during the Wrights’ first trip to Kitty Hawk, North Carolina.
The fabric for their first powered machine , flown in Kitty Hawk in 1903, was prepared well in advance. Using the family sewing machine, they stitched up the wing coverings in the front parlor of their Dayton, Ohio home before traveling to the OUter Banks. The fabric they chose was the “Pride of the West” muslin, a tight woven cotton cloth used, as often described, for “ladies undergarments”.
When the Wright Company opened for business in 1909, the Wrights employed several full-time seamstresses to follow the patterns, cutting and stitching the wing panels together for the aircraft in production, including Model “B” and Model “C” Flyers. The fabric for these machines was cotton which had been infused with rubber to make them the most airtight, waterproof, and durable of the coverings used.
In 1911, Orville Wright made the last journey to Kitty Hawk for flying experiments. He took along a new glider, the first they had built since 1902. The glider was designed for soaring flight, long a goal of the Wrights. It was with this machine that the fabric may have played its most crucial role than in any other. With this glider, Orville shattered the record for soaring flight – staying aloft for over 9 minutes in one flight, and covering only 40 yards on the ground.
Although this amazing flight is a testament to Orville’s skill as a pilot and the stability of the aircraft, it is also perhaps the most dramatic example of the effective use of the fabric-covered wings they made.
The Pride of the West
The “Pride of the West” muslin fabric chosen by the Wrights was critical to the success of their aircraft. Visit us to explore a section of the original fabric from the 1903 Flyer, loaned by Orville’s grand-niece, Marianne Miller Hudec who has preserved a large section of the fabric of the 1903 Flyer. This fabric covered the lower left wing panel.
The Wright brothers chose the fabric with care, selecting wing coverings that would realize the performance of their wing designs. As their flying machines evolved, the Wrights would change the fabric they used, meeting their ever-increasing requirements. The fabric yields many clues about the Wrights’ methods for covering the Flyer.
Rib Slits: The ribs of the Flyer’s wings were held in place with pockets sewn in the fabric. At the trailing edge of the wing, the rib emerged through a slit cut into the bottom surface of the fabric. The rib was then lashed to a wire running through another pocket running the length of the rear edge of the wing. This enabled the wing to maintain its integrity even while its shape was changed during wing warping.
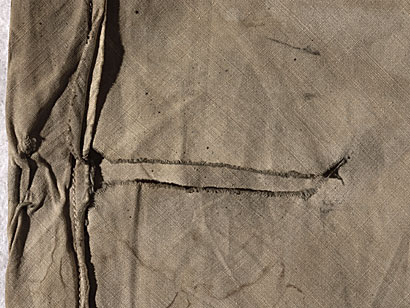
Rib Strut Fitting: The struts of the Flyer were attached to metal fittings which were screwed into the spars through the fabric. The image above shows the location of a strut attached to the rear spar, and clearly indicates the position and size of the screw holes. The fabric tore near the fitting and was repaired with much coarser thread and stitching. Also evident in this image are the stitches for the rib pockets. Although the Wrights were superb craftsmen, they apparently were happy not to trim the excess thread.
Leading Edge: The fabric wrapped the wing like a large pocket, with the bottom side going on first, wrapping around the trailing edge and then attached at the leading edge. The fabric was held in place by hundreds of tacks nailed through the fabric into the leading edge spar. The fabric clearly shows the position and frequency of these tacks, as well as the location of a strut fitting. This fitting indicates that the position of the screw holes was different than those for the rear struts. The stains on the fabric in this image were made by iron oxide from rust, presumably during the fabric’s long hibernation in the Wrights’ shed.
Bias Seams: The fabric for the Wrights aircraft was all sewn ‘on the bias’, meaning that strips of fabric were laid out diagonally across the surface of the wing. When the wing was fully covered, the diagonal directions of the threads on the top and bottom were opposed, giving the wing lateral strength and stability.
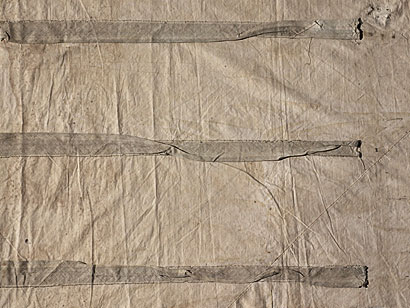
Rib Pockets: Perhaps one of the most unique features of the Wrights’ wings were the pockets sewn into the interior of the wing covering. The pockets were crucial in giving the wings their needed flexibility. These long pockets were made from a coarser material and held the ribs in place laterally as well as allowing the fabric to slide over them during wing warping.
Damage Repair: The fabric was damaged during its flights in 1903, while it was in storage in an outside shed in Dayton in 1913 and has otherwise deteriorated over its long history. It has sustained water stains, tears, and damage from fungi. At some point, several holes in the fabric were covered with small rectangular patches. Handling the fabric with white gloves soils the gloves quickly with coal dust – more evidence of its long storage.
Following the Patterns
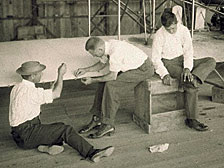
Like every aspect of the Wright aircraft, the method of applying the fabric was not completely known. Susan Wright instilled in her sons a great sense of intellectual curiosity and mechanical skills, not the least of which was the use of the sewing machine. To Susan, Orville and Wilbur, it was just another tool.
The method for covering the wings of the Wrights’ powered machines is virtually identical from airplane to airplane. The covering of the 1903 Flyer’s wings is illustrated below. Join Beverly Hyde and the Wright Experience team as they rediscover this detailed process.
Preparing the Fabric: The fabric used to cover the reproduction Wright aircraft has been meticulously recreated by the Wright Experience after careful analysis of samples of the original fabric. Three companies were needed to successfully reproduce the “Pride of the West” muslin – one for the thread, one for the weaving, and one for the finishing. Long strips of the fabric are sewn together to form the basis of the covering, and then laid out according to patterns derived from detailed study of photographs of the Flyer in 1903. It takes over 150 yards of fabric to cover the Flyer.
Sewing the Panels: In a minor concession to modernity, contemporary sewing machines are used to stitch the wing panels together. The Wrights’ patterns and stitches are followed as closely as possible to the original.
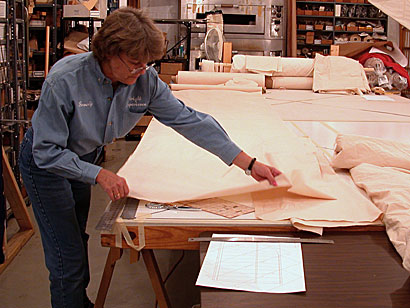
Referencing the Original: Having a large section of the original fabric on loan from Marianne Miller Hudec has enabled the Wright Experience to ensure the authenticity of almost every aspect of the wing coverings. In this image, Beverly and Wendy Hyde cut openings in the trailing edge for the wings’ ribs, with the original immediately at hand as a guide.
Beginning the Covering: The first stage of the covering process begins with the wooden structure of the wing being set up with the ribs attached to the front spar only. The fabric will be slid over ribs from the back of the wing to the front, through the pockets sewn into the interior of the covering.
Into the Pockets: To slide the fabric onto the wing, the pockets are aligned with the ribs, and then pulled through together over the width of the wing panel.
Up to the Leading Edge: Once the fabric has covered the ribs, it is brought forward to the leading edge and clamped in place.

Adding the Rear Spar: With the leading edge clamped in place, the rear spar is passed through openings in the ribs. When complete, there will be nothing holding the ribs in place other than the fabric.
The Extra Pocket: Although it serves no purpose other than authenticity, the Wright Experience has included an extra rib pocket as it existed on the original Flyer. At this stage in the covering process, the fabric is being brought over the top of the wing to be tacked in place.
Tacking the Leading Edge: The wing panel is completed by tacking the bottom side of the fabric to the inside of the leading edge spar, then tacking the top side to the front of the spar. Each tack is placed one-half inch apart. It takes over 9800 tacks to complete the Flyer.
Wing Panel Seams: The Flyers’ wings are made of three panels each: one in the center, and two on either end. The center panel is rigidly trussed as it has to support the pilot, engine, and transmission system. The outer panels are flexible, and can be warped for pitch control of the aircraft. The panels are stitched together once each is complete, and are held in place by the spars, which are held together with metal hinges.
Tacks and Stitches: The tacks and stitches of the Flyer are simple but effective, and are easily replaced and repaired.
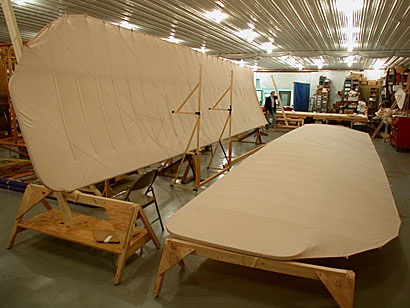
The Finished Wings: Once the covering is finished, the strut fittings will be attached. Then the wings will be stacked vertically with the leading edges on the floor, and then joined with the struts before being turned over to their horizontal position.
Form and Function
The vintage airplane fabric not only covers the wings, it also helps hold them together, allows them to be flexible, and has other surprises while in flight. The Wright brothers chose their fabric as carefully as any other part of their Flyer–perhaps even more so, as it was one of the few components they did not make themselves.
The Wright brothers’ aircraft were dependent on their flexibility for control. The wings were twisted, the elevator bent. But the fabric also fluttered, and ballooned in the wind. In the absence of an engine, its performance was critical. See how the fabric actually helps the Flyer fly!
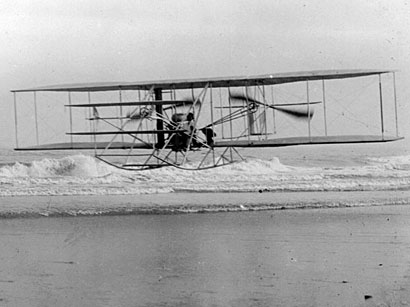
During the 2003 wind tunnel tests conducted on the reproduction 1903 Flyer, the fabric was observed to have two distinctly different behaviors on each surface of the wing. The upper surface lifted, rising slightly away from the ribs in a ‘ballooning’ effect, whereas the lower surface only fluttered, held more closely to the ribs by the interior pockets. A close examination of the famous image of the first flight of 1903 reveals this ballooning effect. The wind tunnel data should reveal what effect, if any, the fabric’s behavior has on the flight characteristics of the airplane.
Beyond creating the actual surfaces for the air to flow over to create lift, the fabric must also allow for the flexibility required by the wing-warping system of the Wright machines. The trailing edge of the wings will need to move a full 24 inches from their neutral position to achieve this position. The fabric, by being sewn diagonally across the surface, maintains the lateral strength and integrity of the wing during wing warping.
When we observe the aircrafts, we can see how the fabric seems to billow up on the upper surfaces of both the upper and lower wings, and the wings’ shape seems distorted. After significant stress, the fabric on the Wright planes would eventually lose its elasticity and become too loose to be effective, an indication that the aircraft would need to be recovered.